 I'm a Python, Linux, Nix/NixOS, JavaScript, Rust, ...
basically everything open-source enthusiast.
I'm a Python, Linux, Nix/NixOS, JavaScript, Rust, ...
basically everything open-source enthusiast.

Running multiple unprivileged OpenVPN instances at the same time with every network having separated set of applications.
Goals
I never liked how VPNs are integrating into computer’s main network. But what if I tell you we can separate that and do even more:
Let’s do this:
- Multiple VPNs at the same time
- Do not touch primary computer networking
- Run specific applications per specific VPN
- Do all this without privileged access
Linux Namespaces
We can do all above with setting up Linux Namespaces which is a Linux kernel feature and is already in stable versions of kernels for some time.
What are Linux Namespaces?
Feature of Linux kernel that partitions resources such that one set of processes sees one set of resources while another set of processes sees a different set of resources.
Let’s see what kind of resources are available to partition:
- Mount
- Process ID
- Network
- Inter-process communication
- UTS (hostname)
- User
- Control group
- Time
Note: This is how containerization works and this is why you need some sort of virtual machine running Linux when using Docker on non Linux operating systems.
Let’s see the solution
Although there are many ways to set up this kind of solution, I will be using:
- Namespace setup tool: nsjail
- User mode networking: slirp4netns
- To bind the things together: Nix
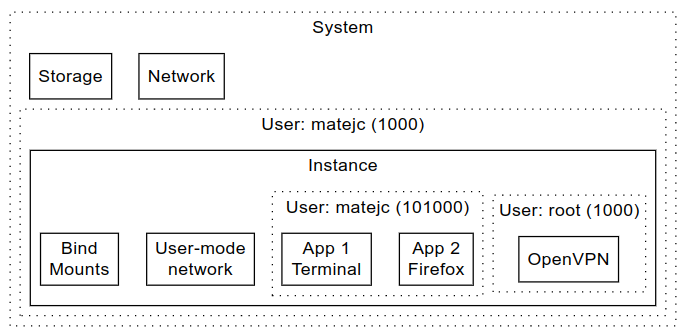
With nsjail we will be setting up namespaces and run the OpenVPN inside along with our predefined graphical applications; for process manager inside the nsjail I choose SupervisorD. Slirp4netns will be providing user space network. While Nix will take care of all dependencies.
Visualization of one nsjail instance:
Usage
First, we require standalone nsjail.nix file which resides in my playground repository named helper_scripts. We will extend that file as many times as we have OpenVPN environments.
The Nix script (extended from nsjail.nix)
Let us save this file as myvpn.nix.
{ pkgs ? import <nixpkgs> {} }:
import /home/matejc/workarea/helper_scripts/nixes/vpn/nsjail.nix rec {
  inherit pkgs;
  name = "myvpn";
  user = "matejc";
  homeDir = "/home/${user}";
  vpnStart = "openvpn --config /etc/openvpn/ovpn --daemon --auth-user-pass /etc/openvpn/pass";
  vpnStop = "pkill openvpn";
  openvpnConfig = null;
  cmds = [
    { start = "firefox --no-remote"; }
  ];
  packages = [ pkgs.firefox ];
  romounts = [
    { from = "/run/opengl-driver"; to = "/run/opengl-driver"; }
    { from = "${homeDir}/.vpn/${name}/etc/openvpn"; to = "/etc/openvpn"; }
  ];
}
Parameters
pkgs
Pass nixpkgs to the nsjail.nix.
name
Name of the environments, need to be unique since the state path is created like so:
1
${homeDir}/.vpn/${name}/
Example:
1
/home/matejc/.vpn/myvpn/
user
Username of user running this environment.
homeDir
Home dir of user running this environment.
vpnStart
Command to run OpenVPN (must be in daemon mode).
vpnStop
Command to stop OpenVPN.
openvpnConfig
Main configuration file for OpenVPN, if this is set, you do not need vpnStart and vpnStop, but then there is no way to set extra OpenVPN arguments like –auth-user-pass, so we set it to null.
cmds
Commands to start after OpenVPN is connected.
packages
Nix packages used in cmds.
romounts
Read-only mounts.
Here we mount OpenGL drivers and openvpn folder.
Running
Before we run it first time, we need to add ovpn (OpenVPN connection configuration file) and pass (credentials) file to the proper path: ${homeDir}/.vpn/${name}/etc/openvpn.
Example:
1
2
3
mkdir -p $HOME/.vpn/myvpn/etc/openvpn
cp config.ovpn $HOME/.vpn/myvpn/etc/openvpn/ovpn
printf "username\npassword" > $HOME/.vpn/myvpn/etc/openvpn/pass
Now, to run Firefox inside OpenVPN network, you just need to execute: nix-shell ./myvpn.nix. Soon the Firefox should appear on your desktop, you can check in this Firefox which public IP you have (for example, navigate to https://www.ipaddress.my/) and compare it with the browser you normally use.
To quit the environment (exit from the browser and kill the OpenVPN) you need to type Ctrl+C for the nix-shell command.
Conclusion
I am using this setup on NixOS, in the past I used it on Fedora Silverblue with Nix installed, but it requires a bit different configuration (talking about the myvpn.nix file).
Why is this useful, you might ask? Well this is more like a prototype, so it can be rough on the edges, but even now can be useful when you would like to retain your network while accessing some web service through VPN. One use case is, you work as a consultant at a company A and having a client B as one does, you could use your primary network for company A and access services of company B through this solution.

